
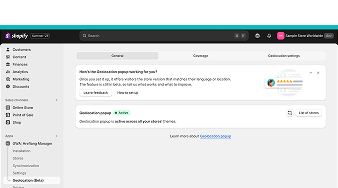
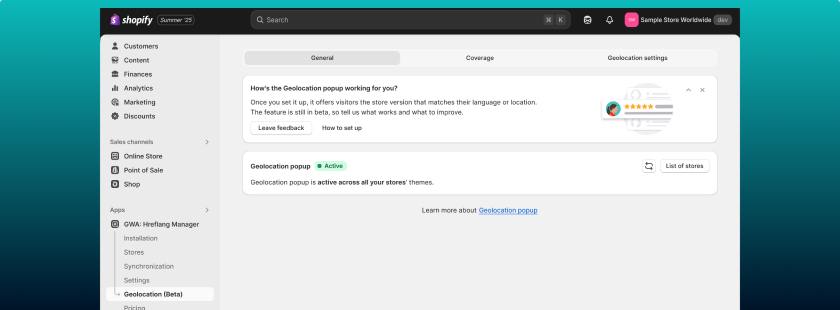
Geolocation page
Note:
Please note that the Geolocation Popup functionality is in the Beta testing mode, so in case you have any feedback on its performance, please refer to the How's the Geolocation popup working for you?.
The Geolocation Popup is an intelligent tool designed to automatically direct visitors to the most relevant localized version of your store. The app analyzes their location and offers an instant redirect with the relative path via a seamless, non-intrusive popup that is integrated with the setup hreflang tags settings.
Key capabilities:
- Smart Location Detection: The system automatically identifies the visitor's country and suggests the corresponding regional domain or subfolder, based on the Coverage generated automatically from your connected stores' Shopify Markets and shipping settings.
- Seamless integration: The popup is built to work in perfect synergy with Shopify Markets settings, multi-store configuration, and your existing
hreflangtags. - Full visual customization: You can easily adjust the design (colors, buttons, text) to ensure the popup feels like an organic part of your brand’s theme, no coding required.
- "Set and Forget" reliability: Once configured, the system maintains link accuracy automatically, even if you update your URL structures.
General tab
This tab is created for you to review all the necessary information on the Geolocation Popup performance and status in your stores.
This block changes depending on whether you've already enabled the Geolocation popup.
Before you enable the popup:
We've launched the Geolocation popup in beta. Join in.
It offers visitors to switch to the store version that matches their language or location. So shoppers who land on the wrong version still get to the right place.
- Join beta testing: takes you to the Geolocation settings tab to enable the popup.
- How to set up: opens this Setup Guide.
After you enable the popup:
How's the Geolocation popup working for you?
Once you set it up, it offers visitors the store version that matches their language or location. The feature is still in beta, so tell us what works and what to improve.
- Leave feedback: send us your suggestions, report issues, or tell us what additional features you'd like to see.
- How to set up: opens this Setup Guide.
Geolocation popup embed block status
This section monitors the activation of the App embed block within the themes of your connected stores. It ensures the technical foundation for the popup is correctly set up.
- Status badge:
- Partially active (Orange): The App Embed Block is enabled on some of your stores' themes but is missing on others.
- Active (Green): The feature is fully activated across all connected stores.
- Inactive (Grey): The popup is currently disabled in all themes.
- Refresh status: Click this icon to manually trigger a real-time check across all your stores. This will update the current activation status of the embed blocks.
- List of stores: A shortcut to the settings page, where you can manage the activation for each individual store.
Coverage tab
This tab shows every country, language, and URL combination your Geolocation Popup can offer to visitors, generated automatically from your connected stores' Shopify Markets and shipping settings. Unlike the Stores page, where you set up your store connections, Coverage is where you review and fine-tune exactly what the Geolocation Popup uses: you can't add or remove countries, languages, or URLs here, but when an entry has more than one URL, you can choose which one the popup should use.
Coverage has three sub-tabs, mirroring the three "Selectors to display" options available in Customize (Country & Language, Country only, Language only):
Country + Language(default view)
Use this view when your popup lets visitors choose both a country and a language. Each row is one country and language combination. If the same combination is available on more than one connected store, only one URL can be active at a time, use the Status badge to enable the one the popup should use.
- Country, Language: the combination this row represents.
- URL: the store version the popup redirects to for this combination.
- Currency: the currency shown to the visitor for this combination.
- Source: currently always Market.
- Status: Active or Inactive, shows whether this is the URL the popup currently uses.
Country
Use this view when your popup lets visitors choose a country only. Each row is a country, independent of language. If a country has more than one available URL, the active one is shown, with a "+{number} more" count next to it. Open the list to choose another.
- Country, URLs, Currency, Source: same meaning as in Country + Language, without the language dimension.
Language
Use this view when your popup lets visitors choose a language only. Each row is a language, independent of country. Same "+{number} more" behavior as the Country sub-tab.
- Language, URL, Source: same meaning as in Country + Language, without the country or currency.
Use the search field to find a specific country or language, and the sort menu to order entries alphabetically or bring duplicates to the top.
Geolocation settings tab
This tab is the "control center" for your Geolocation popup. Here, you can activate the feature, manage technical integration across different stores, and fine-tune the behavior of the popup to match your customers' journey.
Enable the Geolocation popup
This is your starting point. To begin offering a localized experience, you must first toggle the feature on.
Well done! Now enable the popup in the necessary store using the Popup embed block status below.
Please note that this feature is currently in Beta testing. You can try it for free now and leave your feedback in the General tab. Later, it'll be available only for the clients with the Advanced plan.
Once enabled, a dismissal banner will appear advising you to disable "Automatic redirection settings" in your Shopify Admin > Preferences.
Note:
Why it matters: If Shopify’s native auto-redirects are active, they might trigger before our popup has a chance to show. This creates a confusing experience where users are aggressively "teleported" to another store without their consent, which may lead to the unpleasent customer experience.
Popup embed block status
For the popup to actually appear on your storefront, it must be enabled within the Shopify Theme Editor of each store you’d like the Geolocation popup to work in. Activation of the statuses in this block is the second step of configuring the Popup settings.
The table lists all the connected to the Hreflang Manager stores and whether the App Embed Block is active.
To enable the popup to appear in a specific store, use the "Enable popup" link to jump directly to the Theme Editor for this store.
Status badge:
- Partially active (Orange): The App Embed Block is enabled on some of your stores' themes but is missing on others.
- Active (Green): The feature is fully activated across all connected stores.
- Inactive (Grey): The popup is currently disabled in all themes.
Note:
It’s possible not to enable the popup in each of the connected stores. The general Embed block status can stay as Partially active if it corresponds with your international strategy. This way, the popup will not appear on the stores where it’s disabled, but those stores will be available in the selectors of the popup on the stores where it’s turned on.
If you’ve just enabled the block in Shopify but don't see the update here, use the Refresh button to sync the status.
Popup display logic
This block allows you to set up the conditions under which cases, for what customers, and when the Geolocation Popup will perform.
This setting defines when and to whom the popup should appear. Choosing the right logic is key to balancing marketing goals with a smooth user experience.
Options include:
- Show always when the visitor is on the wrong version (Default)
The most intelligent setting. It only interrupts the user if they are definitely in the wrong place (e.g., a French user on the US store). - Show for the first visit to everyone
Ideal for global brand awareness, ensuring every new visitor knows you have localized options. - Show for the first visit, only when on the wrong version
A "light" version of the default setting. Less intrusive for returning customers. - Show always to everyone
Use this if you want to force a region/language choice on every single visit as a welcome popup.
Show popup again after its first closure
Your customer can decide not to interact with the Geolocation popup’s content at all - close it via “x” in the top right corner or just click at any place on the screen outside the popup window. To respect their choice, you can choose the time frames for how long the app should "remember" that choice before showing the popup again in returning visit.
Available frames after which the popup will be shown again:
- in 7 days
- in 14 days (Default)
- in 30 days
- Never
Note:
Setting this to "Never" is very friendly, but might lead to lost sales if a user accidentally closes the popup. A 14-day window is the "sweet spot". It respects the user's initial decision while gently reminding them of the correct version if they return later in the month.
Show popup after (Delay)
In case you already have other popups or your own vision of how fast the Geolocation Popup should appear on your store, in this setting, you can define that. Use the range from 0 to 20 seconds to set this up (default: 5 seconds).
This allows the page to load and the user to get their bearings before the popup appears. It feels more natural and significantly improves the perceived speed and quality of your site.
Popup translation tab
For the time being, this tab displays a temporary placeholder, as we’re currently working on implementing this functionality.
Please stay tuned — we’re excited to bring you even more valuable features for your Geolocation popup very soon! 😊
Customizing the Geolocation Popup in Theme Editor
To make the Geolocation popup truly yours, you can fine-tune its design directly within the Shopify Theme Editor. This allows you to match the popup’s aesthetics with your brand's identity without writing a single line of code.
Note:
Please note that you need to customize your popup in each of your stores' themes. It allows you to adapt the appearance of the popup to the specific needs of the particular localized store’s audience.
To access this settings block, you need to enable the Geolocation Popups by Hreflang Manager Embed block in your Theme Editor on the App embeds tab. This is the step you’re performing here.
General Settings
Please note that without an active Geolocation Popup toggle status in the Geolocation settings tab, the popup won't work. Ensure it's enabled before setting up the visual.
- Enable Test mode: When toggled on, the popup remains visible in the Theme Customizer regardless of your actual location. This allows you to see all design changes in real-time as you edit.
Force localization context: When enabled, the pop-up displays content based on the Shopify Admin bar selection. This works correctly only with active Markets configured in your Shopify admin settings. Useful for testing specific regional content and translations.
Pop-up Display Settings
This block defines the visual "atmosphere" and shape of the popup window.
- Corners' radius: Use the slider to adjust the "roundness" of the popup window (in pixels). Higher values create a softer, more modern look.
- Pop-up background color: Define the main background color of the popup.
- Pop-up background image: Add the custom background image to the popup.
- Background blur: Adjust the intensity of the blur effect (in pixels) applied to the store page behind the popup. This helps eliminate distractions and focuses the customer’s full attention on the selection.
Selector Settings
Define the appearance of the selectors and their content. Set up how customers interact with the selectors.
- Corners' radius for selectors: Adjust the roundness of the dropdown menus to match the main popup window.
- Selectors' background: Set a specific color for the selector fields to ensure high contrast and readability.
- Selectors to display: Choose whether to show both Country & Language, or just one of them.
- Selectors layout: Arrange selectors vertically (Column) for mobile-first simplicity or horizontally (Row).
- Country selector style: Choose what information to display: Flag, Country Name, and/or Currency.
- Enable country search: When toggled on, the customer is able to search for their country in the selector’s country list.
- Enable language search: When toggled on, the customer is able to search for their language in the selector’s language list.
- Flag shape:Choose between rounded, square, or circle flag shapes.
Pop-up Text Settings
Enter the text that will be seen by your customers on the popup and personalize your message using dynamic variables to improve trust and conversion.
- Title: Use to immediately grab the user's attention and confirm their location. It is the most prominent text in the popup.
- Example: "Shipping to {country}?" or "Welcome to our {country} store!"
- Title color: Use to set a specific color for the main headline to ensure it stands out against your background.
- Subtitle text: Use to provide additional context or a welcoming message that encourages the visitor to switch to the recommended version.
- Example: "We noticed you are visiting from {country}. Would you like to shop on your local store version?"
-
Helper text: Use to offer minor clarifications, such as information about currency, localized shipping, or special regional offers.
- Example: "Prices will be updated to your local currency automatically."
-
Fallback text for unsupported countries: Use to inform visitors from regions you don't currently service why they are being directed to a specific default store.
- Example: "We don't ship to {country} yet, but you can still browse our global catalog here."
- General text color: Use to define the color for all other text fields (Subtitle, Helper, and Fallback) to maintain consistent readability.
Dynamic Variables
You can use the following tags in any text field above to automatically display personalized information:
{country}: Automatically displays the visitor's detected country name.{language}: Automatically displays the language of the suggested store version.
Pop-up Button Settings
These settings define the primary actions your visitors will take. Consistent and clear buttons are key to a high conversion rate.
- Show close button (x): Use to provide a way for users to dismiss the popup if they prefer to stay on the current version without clicking a main button.
- Close button color (x): Use to style the "x" icon so it is visible but remains secondary to your main Call-to-Action buttons.
- Buttons layout: Choose whether the primary and secondary buttons are arranged in a column or a row.
- Corners' radius for Buttons: Use the slider to adjust the roundness of the button corners (in pixels), independent of the popup and selector corners.
- Primary button text ('Change'): Use to create a strong Call-to-Action (CTA) for the redirection, telling the user exactly where they are going.
- Example: "Switch to {country} store" or "Shop in {language}"
- Button 'Change' CSS Class: Use to add your theme’s specific button classes (e.g.,
btnorbutton-primary) so the "Change" button matches your site’s native design. - Show secondary button ('Stay'): Toggle to control whether the secondary button, letting visitors stay on the current version, is shown at all. Enabled by default.
- Secondary button text ('Stay'): Use to label the button that allows the visitor to stay on the current site.
- Example: "Stay on this site" or "No, thanks"
- Button 'Stay' CSS Class: Use to add your theme’s secondary or outline button classes (e.g.,
btn--secondary) to visually distinguish it from the primary action.
Manage App: A quick link that takes you back to the main app dashboard if you need to adjust global settings.
FAQ about the Geolocation page:
What is the primary purpose of the Geolocation Popup?
It is an intelligent tool designed to automatically direct visitors to the most relevant localized version of your store. The app analyzes their location and offers an instant redirect with the relative path via a seamless, non-intrusive popup that is integrated with your hreflang settings.
Is it possible to enable the Geolocation Popup only in a few of the connected stores?
Yes. While the general status might show as "Partially active," you have full control to enable the App Embed Block only in the specific stores where you want the popup to appear.
How do I know if the popup is technically ready to show on my store?
- The Enable the Geolocation Popup toggle in the Geolocation page, Geolocation settings tab should be in the ON position.
- The Geolocation popup embed block status on the General or Geolocation Settings tabs should be Active or Partially active (in case you enabled the popup only on specific connected stores on purpose).
Will the popup automatically redirect my customers without their consent?
No. Unlike aggressive auto-redirects, this popup follows a user-friendly approach. It informs the customer and asks for their permission to switch, providing a much better user experience and protecting your SEO.
What if I want to activate the Popup in a newly added store or the one where it hasn't been active yet?
Simply go to the Geolocation settings tab, find the store in the Popup embed block status table, and click "Enable popup". This will take you to that store's Theme Editor to activate the block. After its activation, the Popup will appear and work on this store the same way as it was set up for all other stores.
Can I test the popup’s design if I am not physically in the "wrong" country?
Yes. Go to the Theme Editor and enable "Test Mode" in General Settings. This forces the popup to stay visible regardless of your location so you can preview your design changes in real-time.
Will the popup work correctly if I activate the App Embed Block in the Theme Editor, but in the Hreflang Manager app, the Geolocation Popup toggle remains OFF?
No. Both the main toggle in the Geolocation settings tab and the App Embed Block in your Shopify Theme Editor must be turned ON for the popup to function.
How does the application know what location is better to recommend to the customer?
The app detects the visitor's country from their connection info (via Cloudflare, with Shopify's own storefront localization used as a fallback). It then matches that country against your stores' Coverage, generated automatically from your Shopify Markets and shipping settings, to find the most relevant store version to suggest.
What is the Coverage tab, and can I edit the countries or languages shown there?
Coverage is the list of country, language, and URL combinations your Geolocation Popup can offer, built automatically from your connected stores' Shopify Markets and shipping settings. You can't add or remove entries manually, but if the same country or language is available on more than one store, you can choose which URL the popup should use.
Where will the customer be offered to be redirected if they are from a country that we're not delivering to?
In such cases, the customer will be offered a redirection to the x-default store version, ensuring they land on your primary global storefront.
What are dynamic variables, and how do they work in texts?
Variables like {country} and {language} act as placeholders. When the popup loads, the app replaces them with the visitor's specific data (e.g., "Welcome to our {country} store" becomes "Welcome to our France store").
Will the client be redirected to the same page on the suggested store version, or just to the main page?
The app provides a deep-link redirect. This means the client will be redirected to the exact same page (product, collection, etc.) on the suggested store version, rather than just being sent to the homepage. If the page is absent on that store, they will be redirected to the Home page of the respective localized store.
How to deactivate the Popup?
To fully deactivate the feature, turn the toggle to OFF in the Geolocation settings tab and disable the App Embed Block in the Theme Editor of each respective store.