Installation instruction
Note:
Hreflang Manager supports two modes: Single-store mode (for brands using Shopify Markets within one store) and Multi-store mode (for brands with multiple independent Shopify stores).
Having the app installed in stores and a pricing plan chosen, finish the setup in 3 simple steps:
- Set up a single store or link multiple stores to each other and select mapping options for product synchronization.
- Select the region for each connected store.
- Inject the app code into your stores.
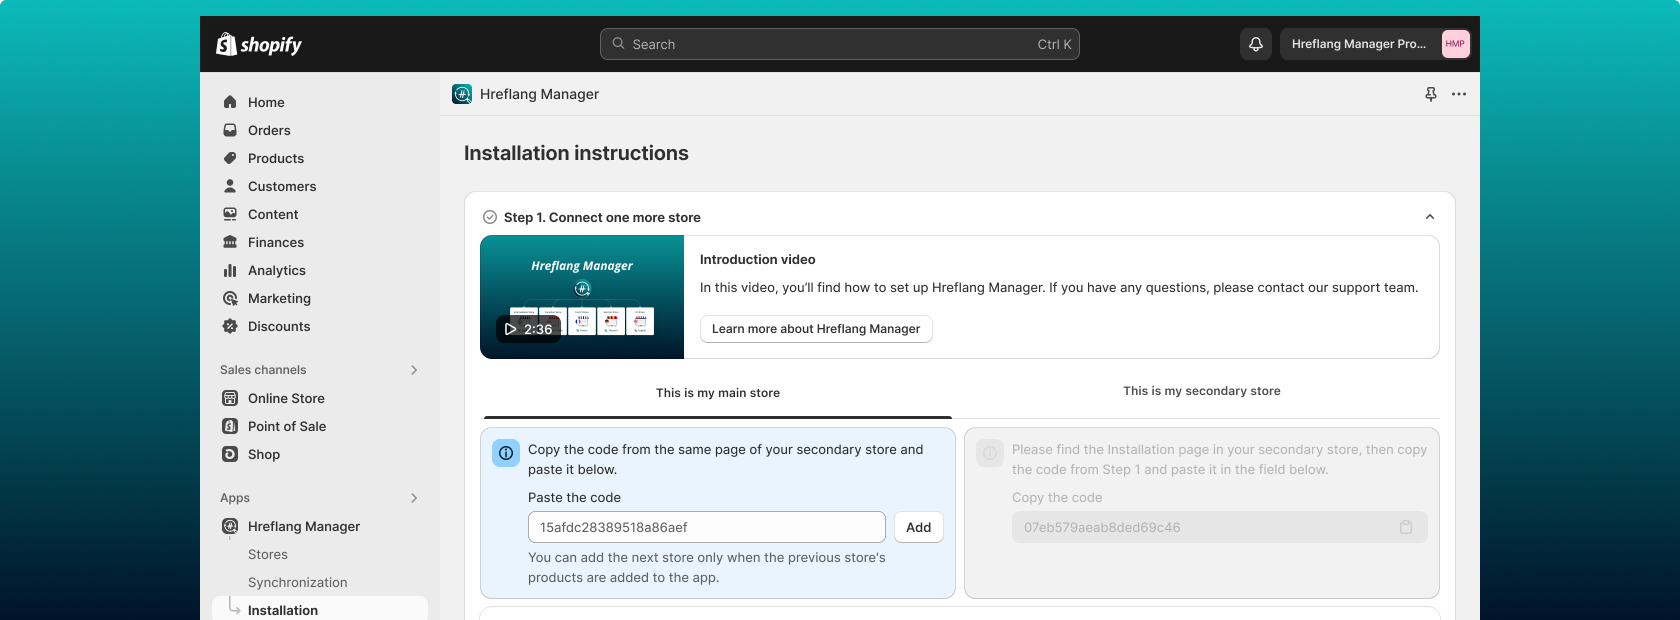
Step 1: Choose the mode: Multi- or single-store
On this step, you can map your Shopify stores to one another or, if you have only one Shopify store with multiple markets, activate the Single-store mode.
If you manage all your international markets within one Shopify store using Shopify Markets:
- 1.Navigate to the Installation page and open Step 1.
- 2.Click the "I have only one store" button.
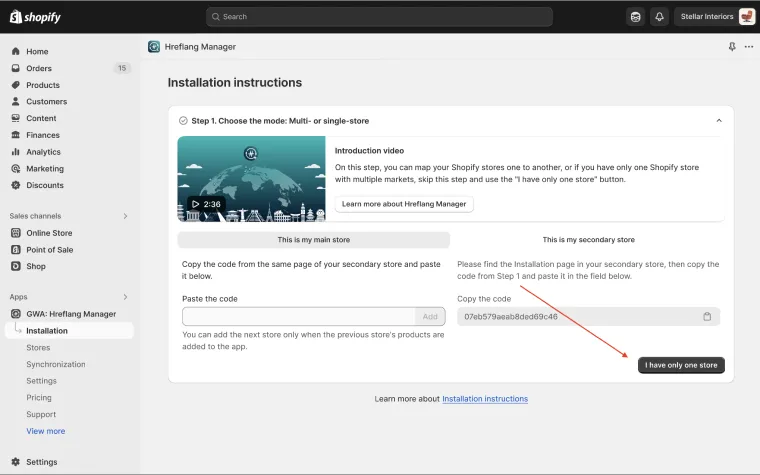
- 3.The step will be marked as "Completed," and you will be redirected to Step 2 immediately. A "Single-store mode" badge will appear next to your store name.
If you have at least two separate Shopify stores:
- 1.Establish which store will be the main one and which store(s) will be the secondary ones
- 2.Open the Hreflang Manager app in any of the chosen stores as a secondary..
- 3.Navigate to the Installation page and open Step 1.
- 4.Choose the option “This is my secondary store”.
- 5.Copy the code from the respective field.

- 6.Go to the store that you decided to be the main one.
- 7.Open the Hreflang Manager app, navigate to the Installation page, and open Step 1.
- 8.Enter the copied code into the respective field.
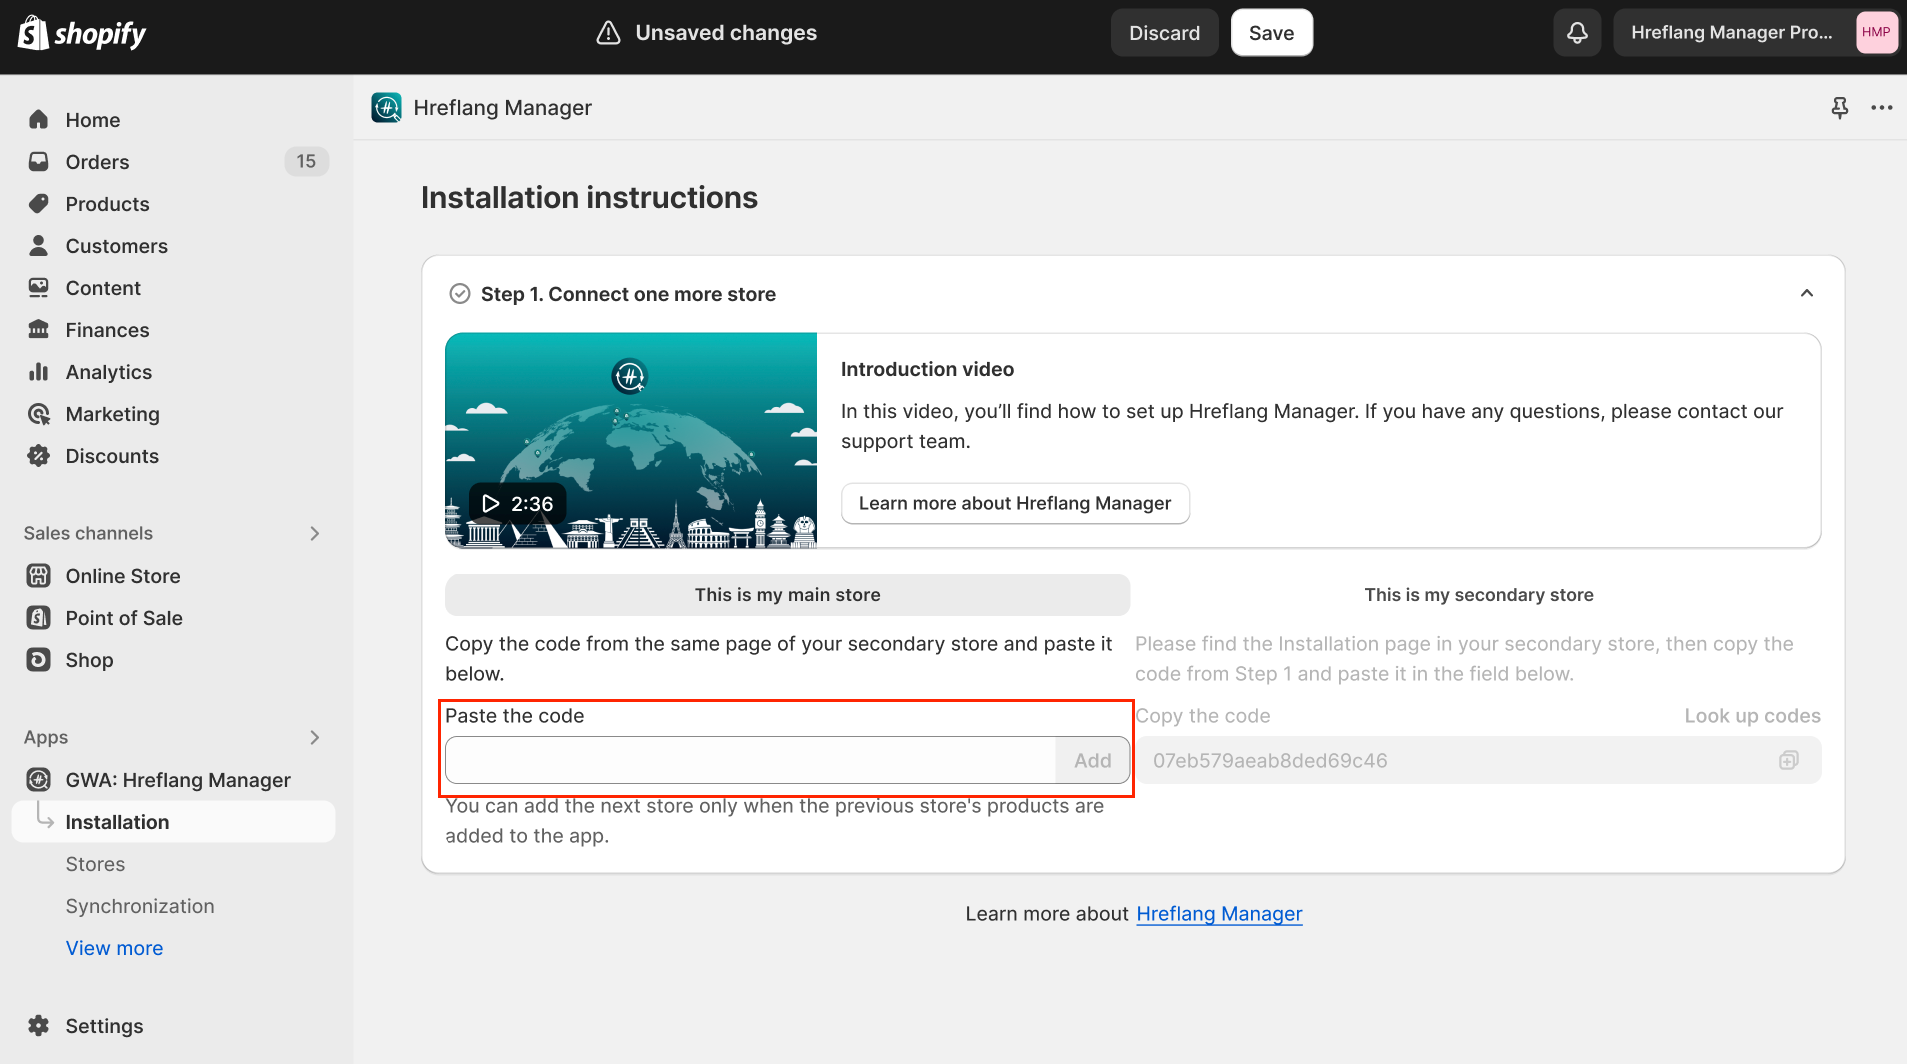
- 9.Tap the “Add” button.
- 10.If you have more than two stores, repeat the flow described for each remaining store.
After saving the store's connections, you can choose the mapping option for your stores in the pop-up. By default, we match using handles, barcodes, and SKUs. However, you may choose to use only the values that are relevant to your needs.
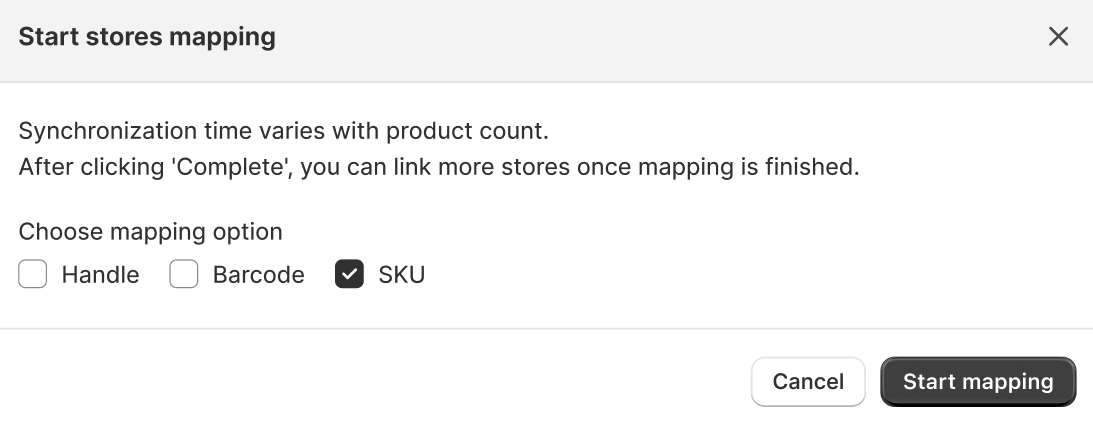
Press the “Start mapping” button to match the stores and move to Installation Step 2.
In case you’d like to remove one of your stores from the synchronization, just use the “x” sign near the concrete store in the “Remove from sync” column.
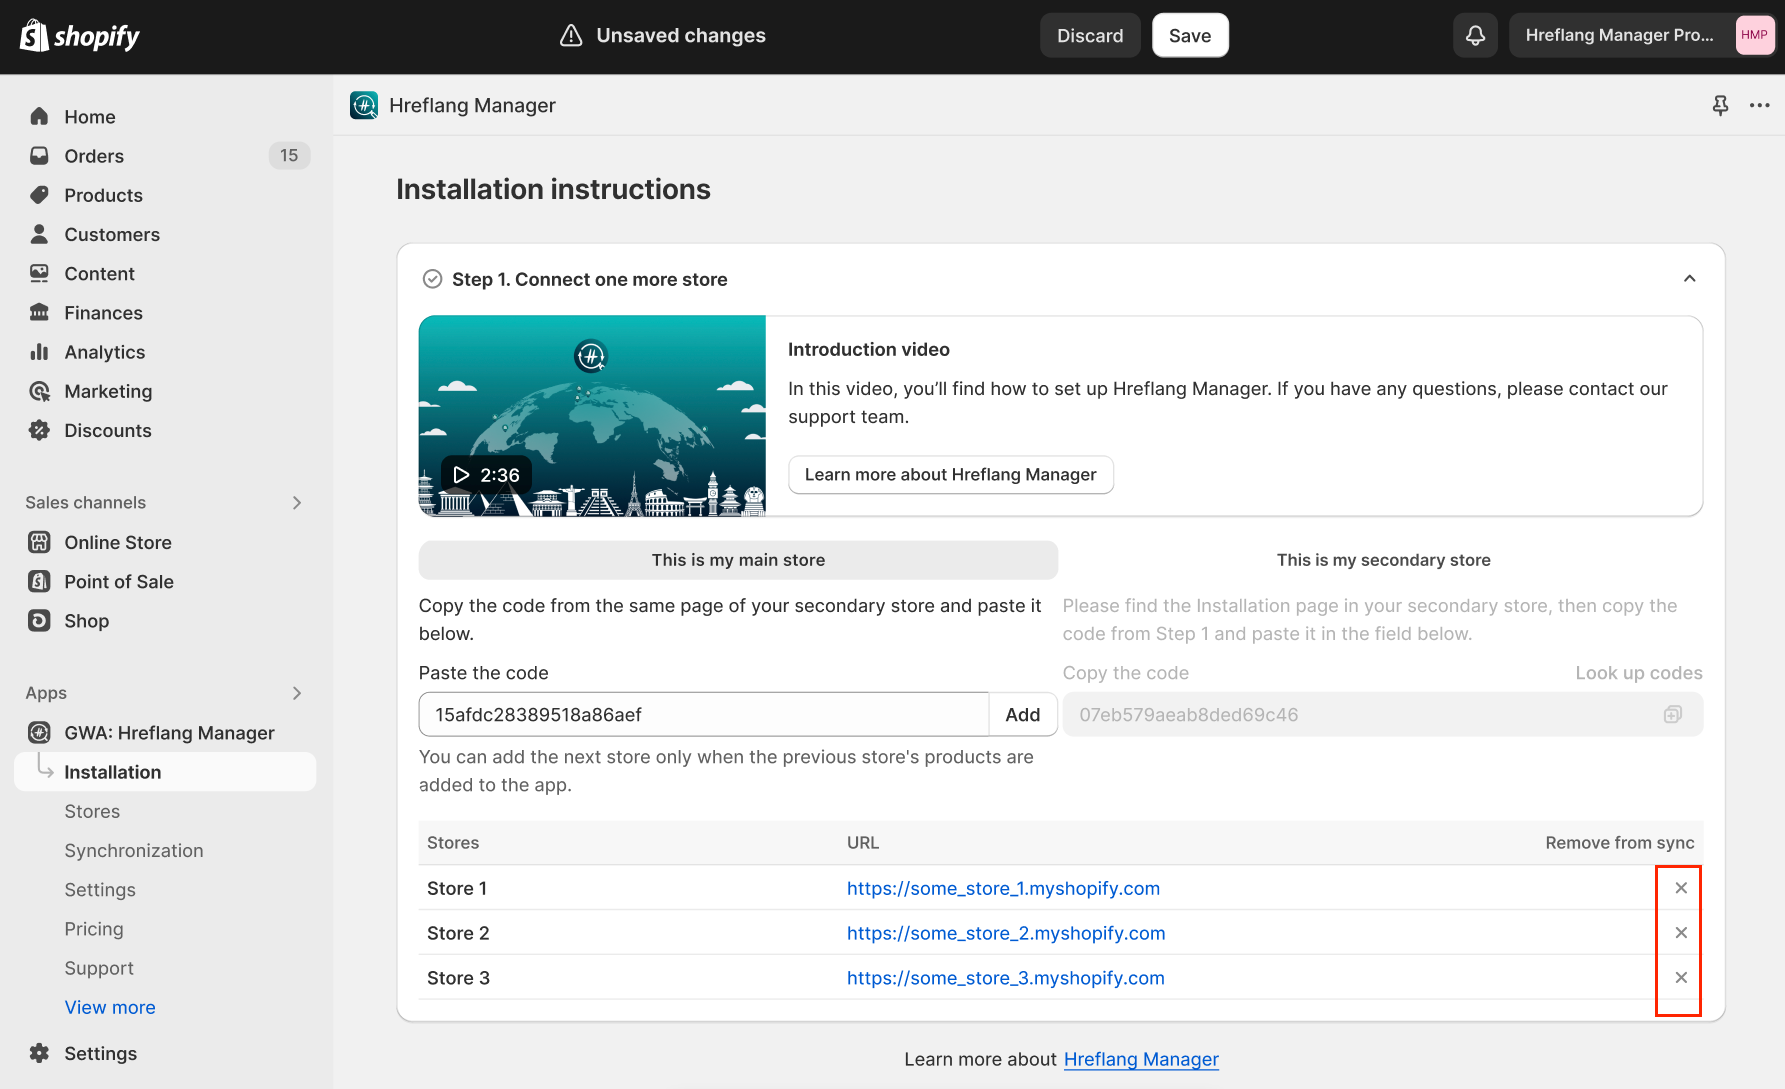
Save the changes and launch the stores synchronization by pressing the Save button in the top modal window after all of the necessary changes and settings have been finalized in this Step.
Step 2: Set up the store’s hreflang tags
After the finalization of Step 1, our application imports the data from your Shopify Market’s settings. It includes all the domains, subdomains, and subdirectories, the language of each, and the associated countries.
On this step, there are several settings for the connected store that need to be configured:
- Store country/region. Initially, the list of countries for a specific domain is being imported from your Shopify Markets settings, but in case you need to optimize it, you can do that here.
A region can be chosen from the country dropdown. If chosen, the domain will be displayed for a particular region.
Refer to this page to read more info about this setting. - Main fallback store (X-default). This store serves as the default destination for visitors whose browser language or region does not match any of the stores configured in the app.
For example, if a visitor’s browser is set to Spanish (Mexico), but there is no Spanish (Mexico) store available, they will be automatically redirected to the X-default store.
Refer to this page to read more info about this setting. - Main language store (Region-Independent Link). This is a store that is not tied to a specific region, but only to the language. For example, it can serve French content for both France and Canada.
Note:
Note: There are a few more features you can set up on this Step if necessary. Also, all of the settings from this step can be changed later on the Stores page. Read more about them here. .
If you’re generally satisfied with the settings that the application imported and set up, you can just use the “Next” button to proceed to the next step.
Step 3: Adding the app code to the live theme
At this stage, as a merchant, you need to add the Hreflang Manager app code to your store's theme. The integration process may vary depending on your store's structure and whether you have multiple languages or markets added.
Step 3 is divided into two parts:
For Stores with a Unified Structure:
- Click "Go to customize" in the Hreflang Manager App.

- In the theme settings, enable the app block.
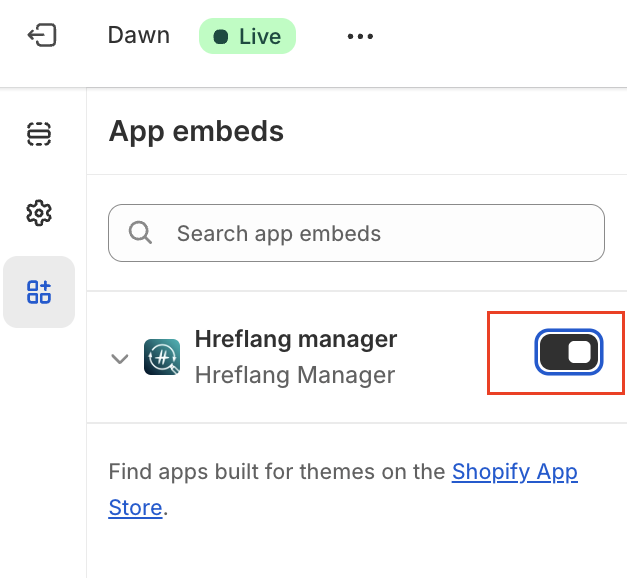
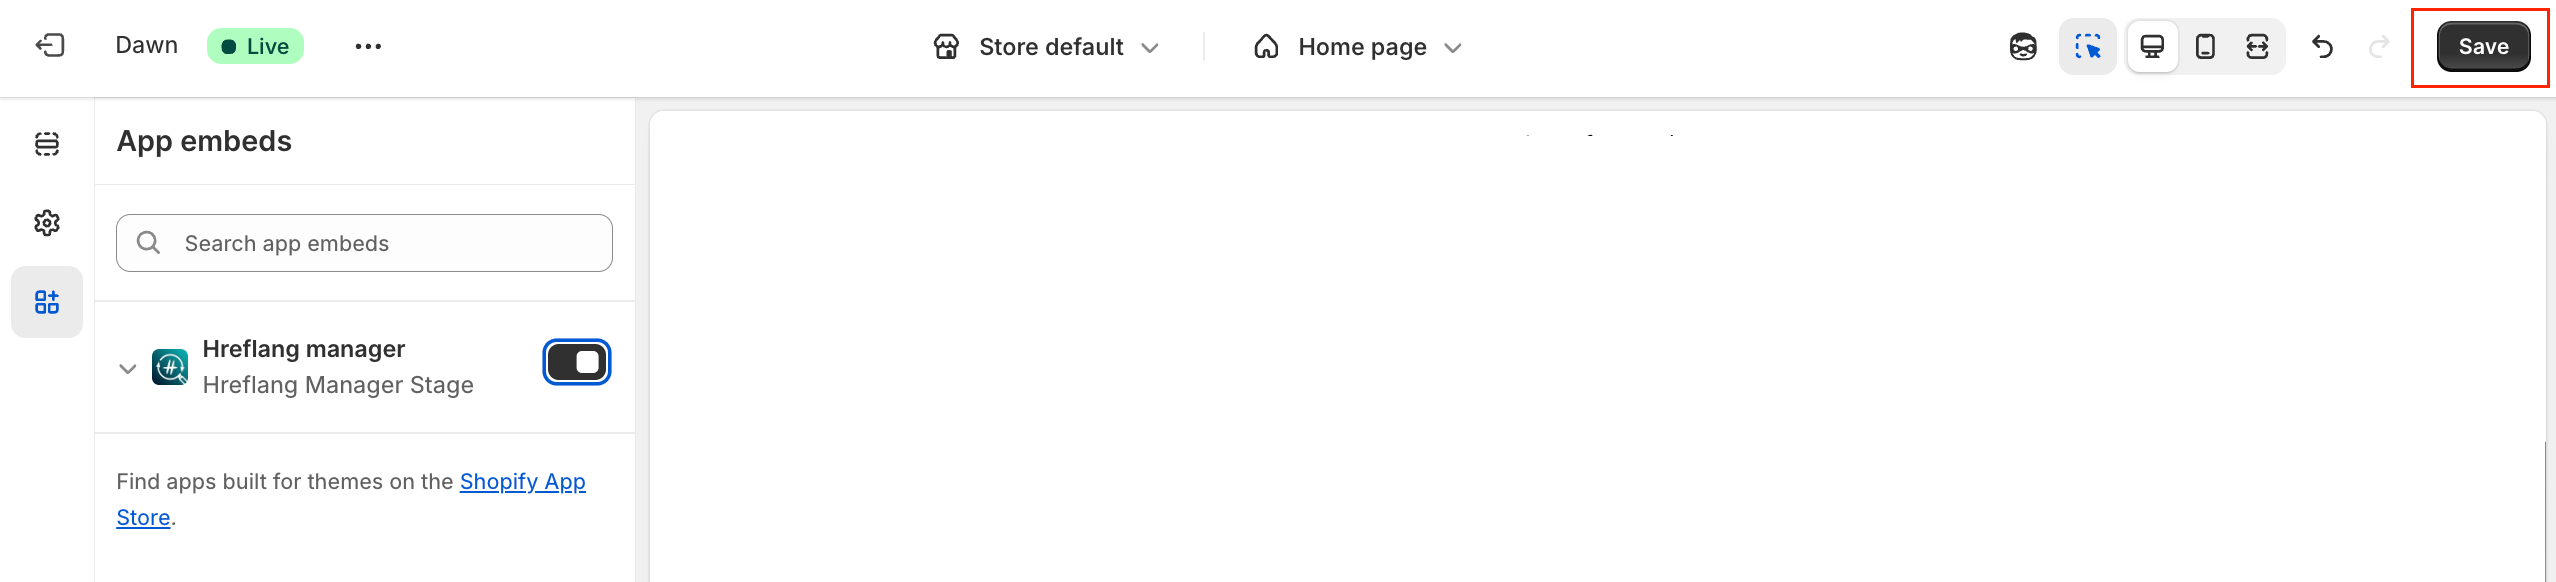
- Save the theme changes.
- Check the result by clicking "Check all stores status."
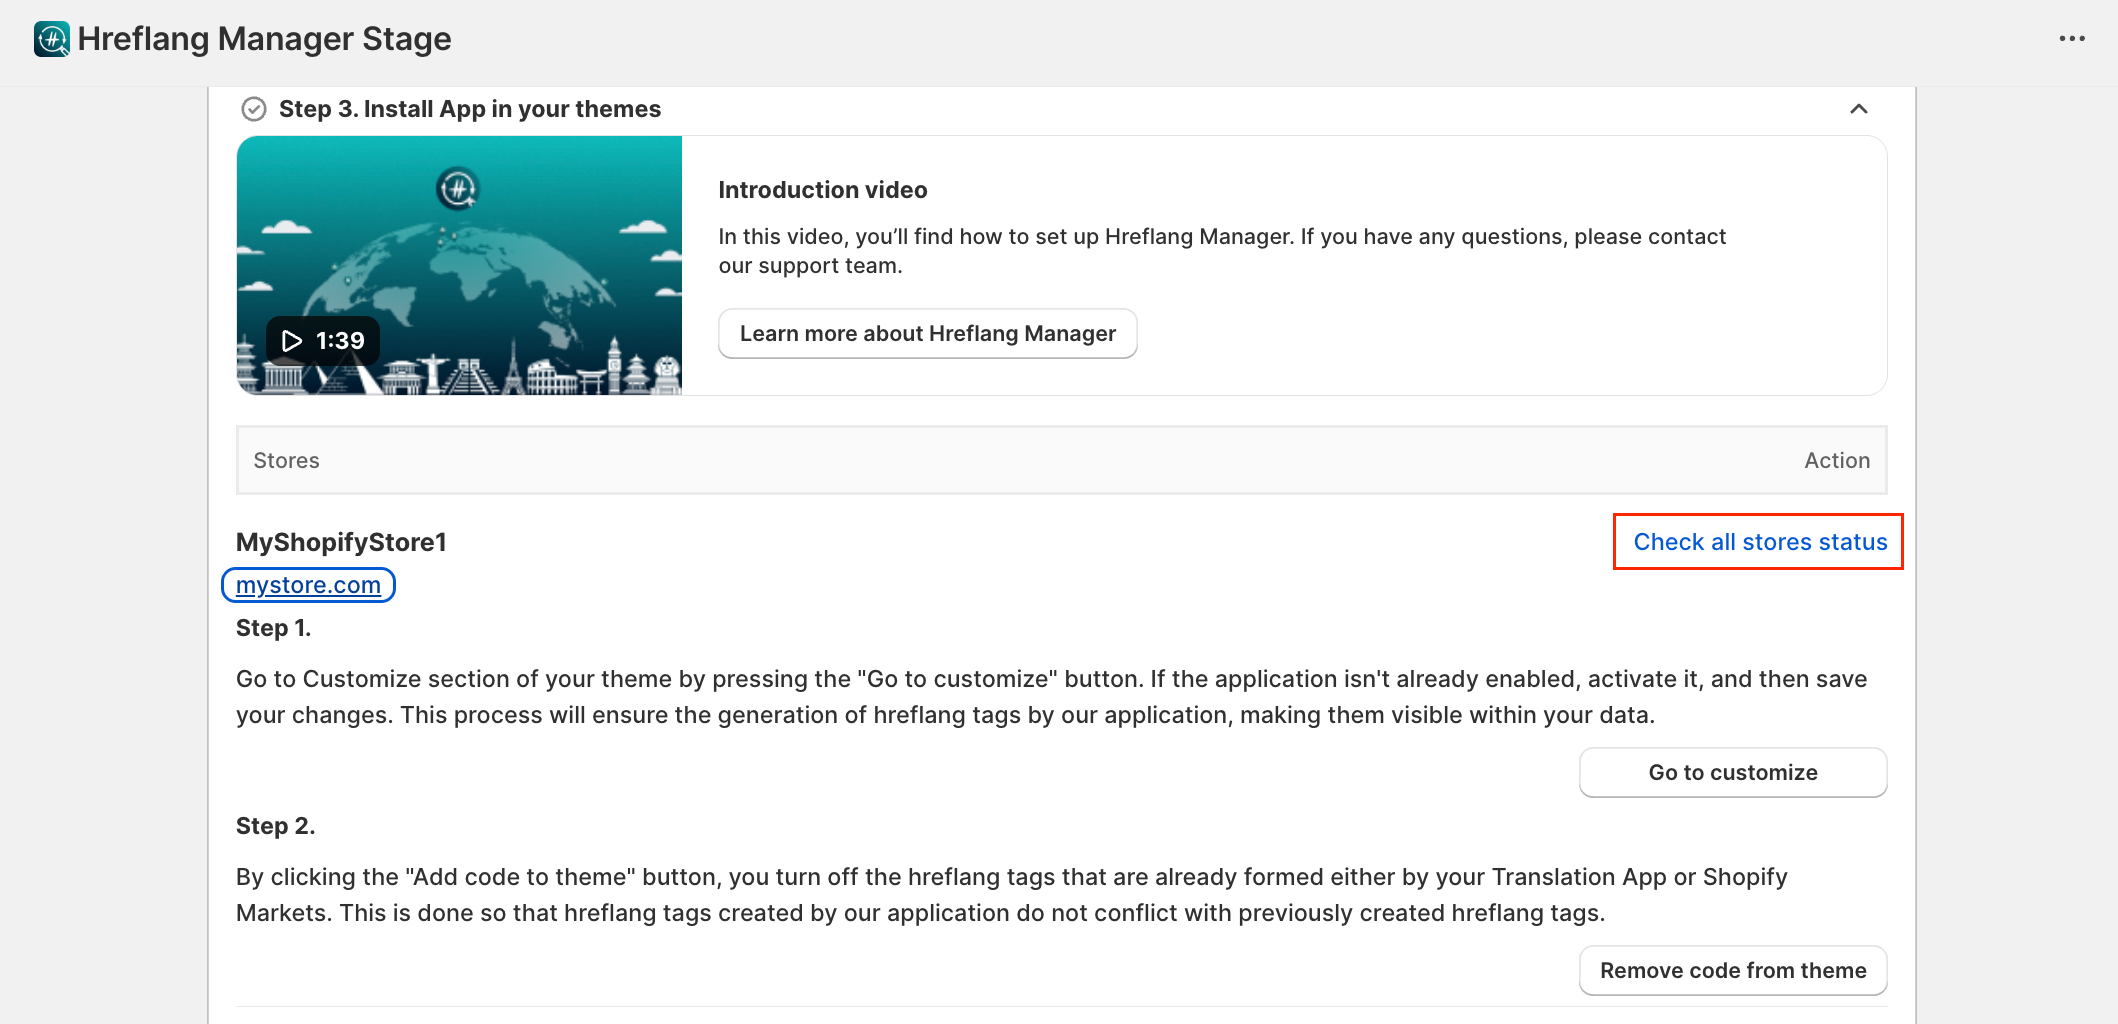
In case of any unfinished or conflicting settings, you’ll be notified via the messages in the app.
For Stores with Added Languages and/or Markets:
If your store already has hreflang tags created by Shopify Markets, extra steps apart from the ones described above are required. These existing tags need to be removed to prevent conflicts with the hreflang tags generated by our application.
- Disable other external hreflang tags by clicking "Add code to theme".
The app will automatically mark them as ‘nohreflang', so they won’t influence your SEO.
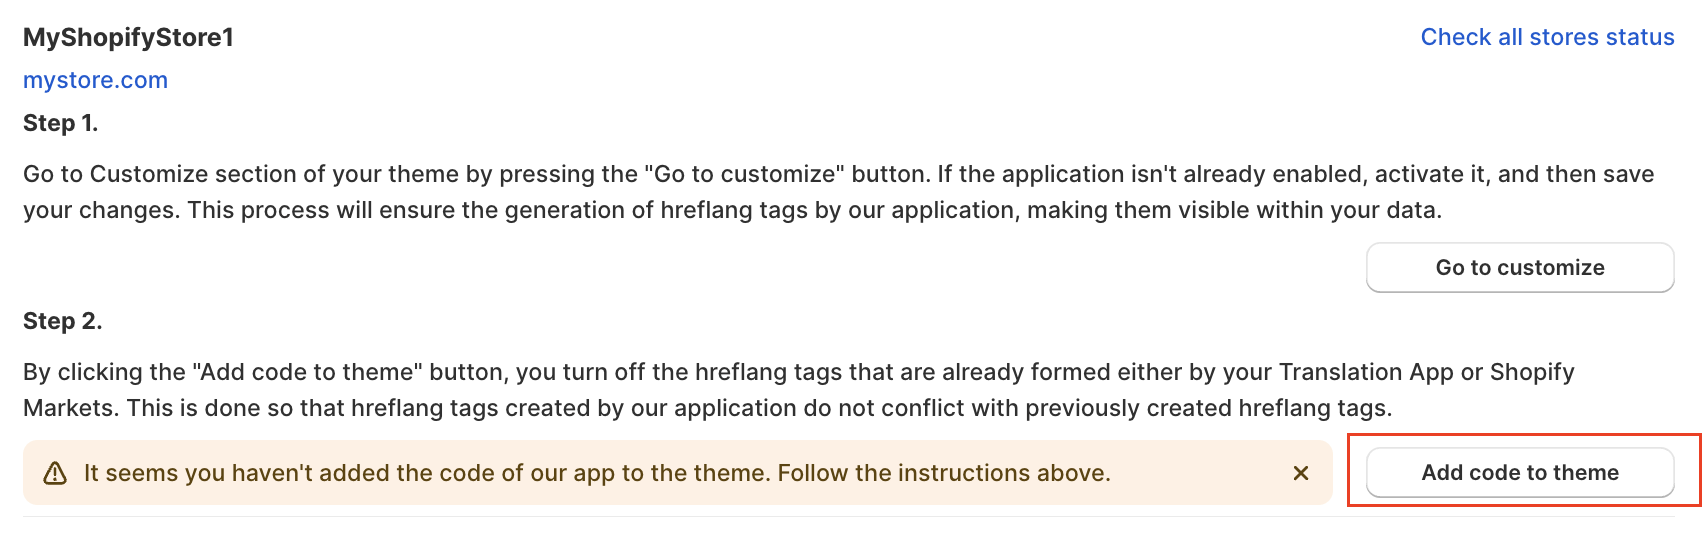
- Check the result by clicking "Check all stores status."
In case of any unfinished or conflicting settings, you’ll be notified via the messages in the app.
These steps will ensure the successful integration of the Hreflang Manager app into your store's theme, tailored to your store's structure.
Uninstall Hreflang Manager
To uninstall the Hreflang Manager app, it is needed to follow these steps:
- On the Dashboard, press Disconnect near the connected store(s). Thus, you will delete the app code from the stores.
- Go to your store’s app list and find Hreflang Manager there. Press the Delete button in front of the app.
There is a possibility that the app code remains after uninstalling Hreflang Manager.
If you uninstalled the app without first disconnecting the stores as instructed above, some code may remain that interferes with hreflang tags generated by Shopify markets. To remove this code completely, you should follow these steps to fully clear the Hreflang Manager App code from your store (or share these instructions with your development team):
- Go to your Admin Panel -> Online Store -> Themes -> Actions -> Edit Code.
- Open the theme.liquid file.
- Find and remove the code {% include "gwa-hreflang" %} OR {% render "gwa-hreflang" %}.
- Save the changes.
- In the search bar, enter the word "hreflang".
- Open the gwa-hreflang.liquid file and click Delete.
FAQ about Installation page:
Which store should I choose as the main store?
Choosing the main store does not affect any hreflang settings. Its purpose is simply to serve as the central location for managing all Hreflang Manager configurations. Select the store that is most convenient for you to manage these settings.
Can I change the main or secondary store later?
Yes, you can change the main store configuration later on the Dashboard page. No other settings, synchronization, or hreflang tags won’t be affected.
What happens if I remove a store from synchronization?
Removing a store will disconnect it from the synchronization process. Its hreflang tags generated by our application will be removed, and will no longer be managed by the app. Your other connected stores will remain unaffected.
Can I use custom product identifiers for mapping?
By default, the app uses handles, barcodes, and SKUs for mapping. However, you can select only the identifiers that are relevant to your business during Step 1 of the installation. Also, you can change your choice later on the Settings page in Product Mapping Settings.
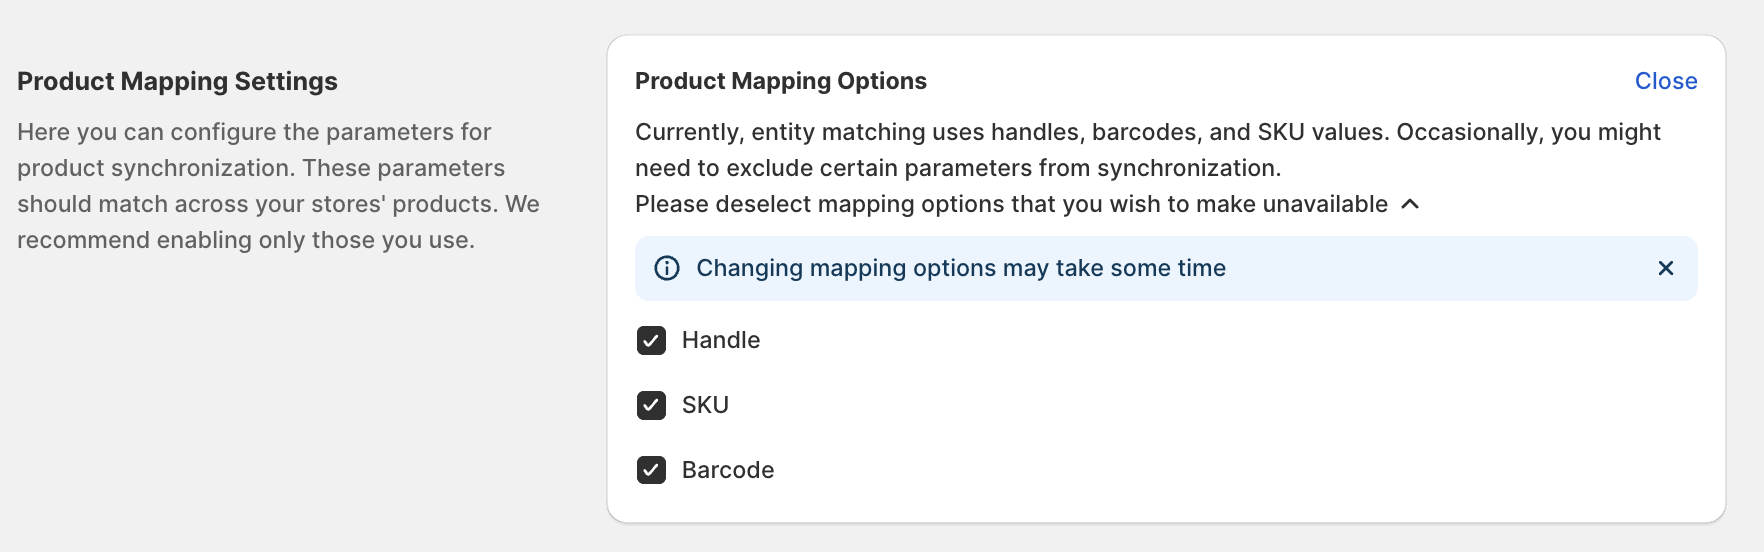
Custom identifiers outside of these options are not currently supported.
How can I check if the integration is successful?
After adding the Hreflang Manager app code to your theme and removing the Shopify Markets' tags, click "Check all stores status" in Step 3 of the installation. The app will verify the hreflang tags and store connections to confirm that everything is working properly. In case of any errors, you’ll see a banner with an explanation.
Can I change the configuration after installation?
Yes, all main settings, including store connections, mapping options, and hreflang configurations, can be updated anytime after installation via the Dashboard, Stores, and Settings pages in the app.
Can I upgrade from Single-store to Multi-store mode later?
Yes! If you connect a second store later, the app will automatically switch to Multi-Store mode, initiate a full product re-sync, and unlock multi-store mapping settings.
What happens if I disconnect my secondary stores?
If you disconnect all secondary stores, the app will offer to switch you back to Single-store mode. This ensures your main store's hreflang tags continue to work without interruption.
Does Single-store mode support product mapping?
In Single-store mode, automatic product matching is skipped since all markets share the same product database. The app focuses on generating correct language/region tags for your existing Market structure.
How do I know if the tags are active?
You can see the status in the App Embed Block Status on your Dashboard. Additionally, check the Synchronization page to see exactly how many products, pages, and blogs have tags injected.