Synchronization page
The Synchronization page allows you to manage connections between your products, collections, and other resources across all connected Shopify stores. Hreflang Manager offers powerful automatic matching based on SKU or Barcode, while a manual synchronization option is present, as well as the CSV Import and Export feature. Utilize these for bulk updates, especially if your store data is not perfectly structured.
Automatic synchronization
Once a second or any further store is added to the application, the automatic synchronization process starts by default. Automatically, the items in your stores can be matched by different mapping keys:
- Products mapping: sync by Barcode, SKU and handle.
- Collections, pages, blogs, and articles mapping: sync by handle only.
Note:
Some items may not be synced automatically due to a discrepancy in mapping keys across stores (for example, if a Collection has different handles in different stores). In such cases, you can either unify the mapping keys in Shopify to make them identical or synchronize them manually.
The synchronization result is usually available in several minutes and depends on the number of items and stores.
Synchronization results (statuses)
When the sync is completed, its result is available in each connection row. There, you can see if the items have been synced fully, partially, or are non-synced.
Synchronized
Full sync means that a particular item (a product, page, etc) has been synced with the same item on each store connected to the Hreflang Manager app.
Partial sync
Partial sync means that a particular item (a product, page, etc) hasn’t been synced with the same item on at least one store. If you receive such a result, you might check this item’s availability at each store in the Shopify admin, leave it without any changes, or sync it manually.
Non-sync
Non-sync means that a particular item (a product, page, etc) hasn’t been mapped with the same item on all other stores. If you receive such a result, you might check this item’s availability at each store in the Shopify admin, leave it without any changes, or sync it manually.
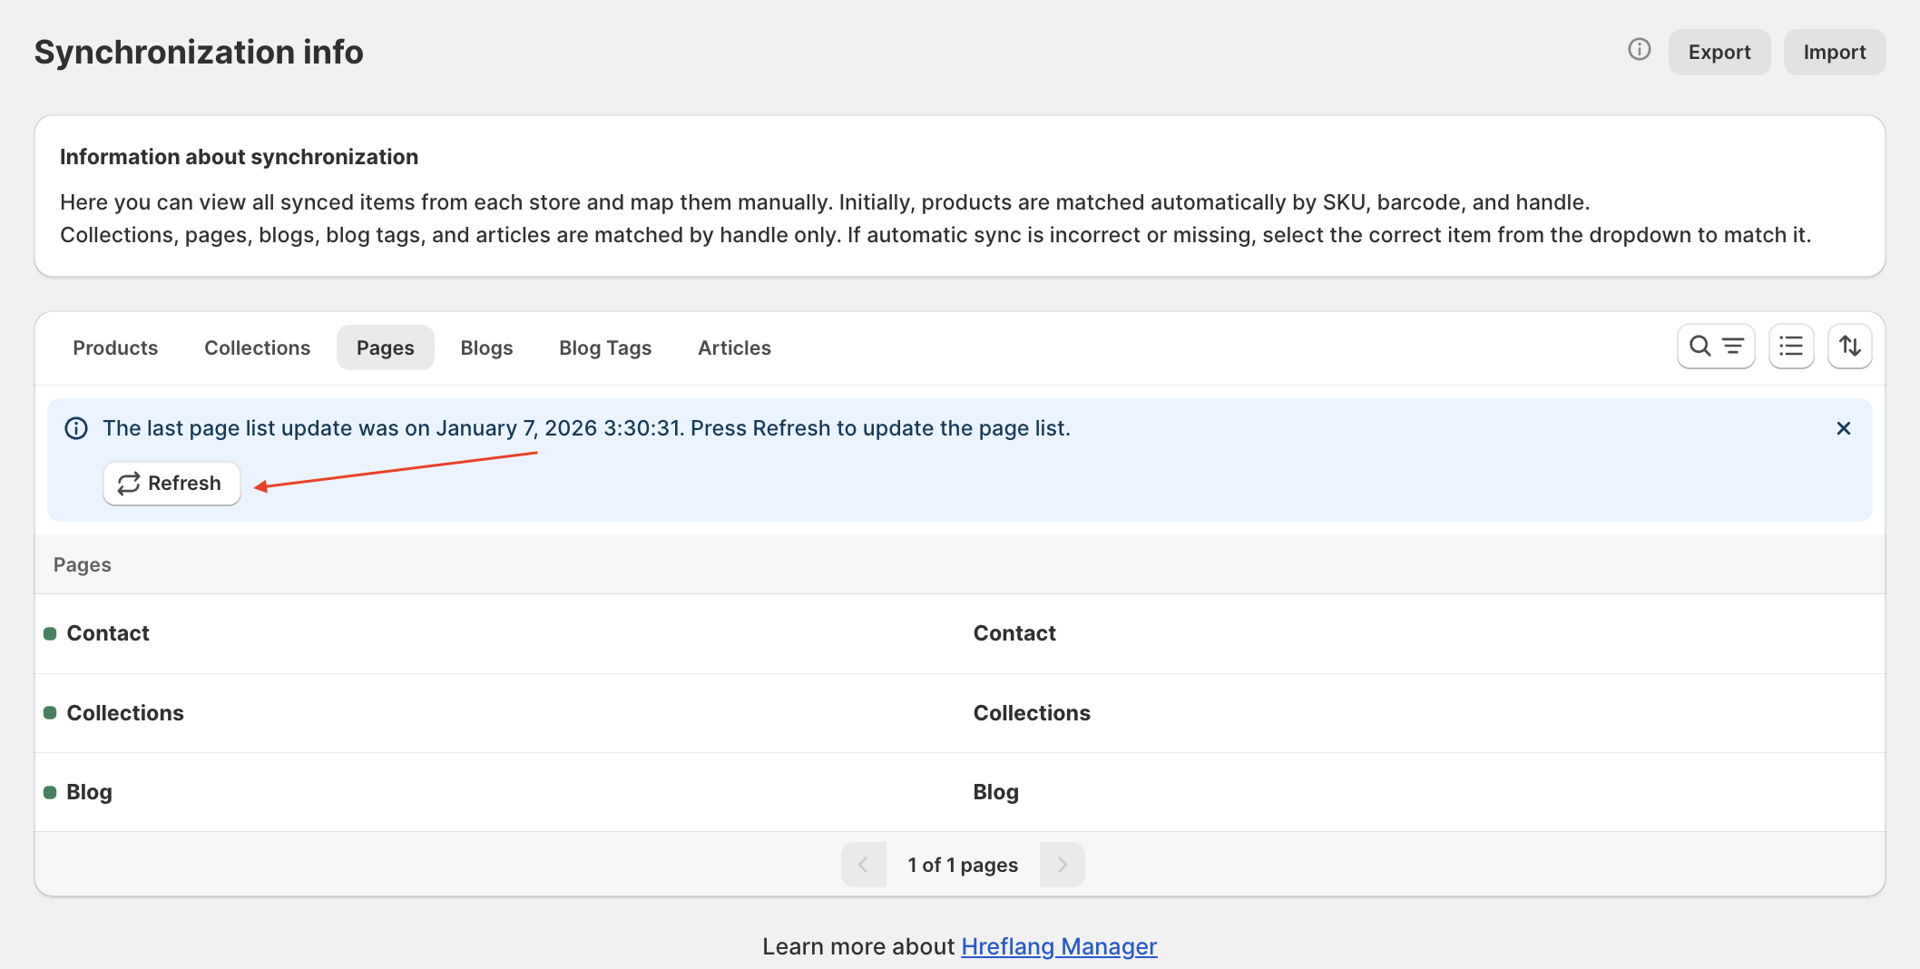
Refresh of each resource type to the latest version (Product, Collection, etc.)
In case one of your store’s or all your store’s item lists has been updated: new products have been added, articles have been edited, etc., you might want to update this info in the Hreflang Manager application to have the up-to-date hreflang tags on your stores.
Important to know:
- Products and collections updates or creation events are being delivered to the Hreflang Manager app right away and are reflected automatically in the app without any manual actions.
-
Pages, blogs, and articles updates or creation events are not reflected in the Hreflang Manager app automatically due to Shopify limitations. To update the item list and info to the latest version, use the “Refresh” button in the respective tab.
Manual synchronization
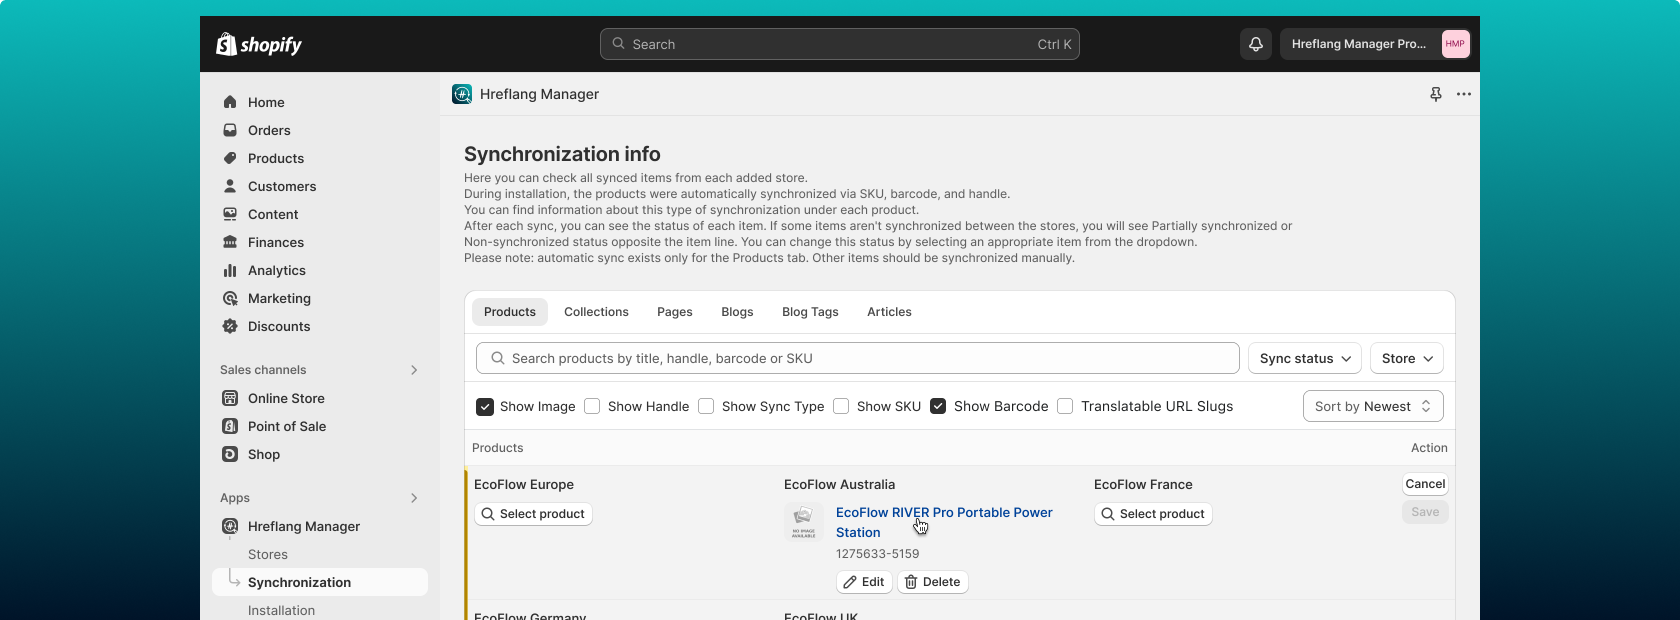
There is a possibility to map items across your stores manually. It can be done following the next steps:
- Go to the Synchronization page.
- Find any product row that contains non-synced elements.
- Press the Select Product button, and start typing an item’s name, SKU, or barcode in the modal window. A product list with matched items should come up.
- Select the required item in the field and press the Save button. The item’s status should be updated for all the stores connected to the app.
You can also edit the automatically mapped connections in case there are better pairs for the items than those that were synchronized by the app.
To break the connection, follow these steps:
- Navigate the necessary connection on the Synchronization page.
- On the incorrectly added item, press the Delete button.
- Save the changes.
Note:
You can edit several or all the connections on one page, but to move to the next page, you need to save or cancel the changes made to the connections on the current page in the Save bar window.
“Select” modal window
In the Modal window that opens when you push the Select product/collections/etc. button, you can see the list of all the respective items for the type of resource that you’re editing. If you’re editing the connection on the Product tab, in the modal window, you’ll only see the available Products.
In the first rows of the Modal window, you might see the recommended items to match with the current connection. Those items are recommended by the app because of some matching mapping keys. For example, only the barcode is identical, but not the SKU and handle.
There are 2 types of items’ statuses there:
- Non-synchronized: Stands for items that weren’t mapped with others yet. No badge is present.
- In sync: Stands for items that are already synchronized. In sync badge is present.
For the items that are already In sync, you can utilize the arrow icon to review to which connection the item currently belongs and make a decision whether you’d like to match this item with another one, or leave it as it is.
Note:
When editing the connection, you can choose both of the items’ types. Just note that when you’re adding to the connection an item that has been previously mapped in another connection, this item will be deleted from the first connection and added to the one that is currently in edit.
CSV Export and Import
Note:
Make sure to get acquainted with the Important rules for data processing before using the CSV Import and Export process for the items mapping on your stores.
Also, kindly note that the CSV Import and Export functionality is currently in Beta testing, and we’re still working on improving it, so in case you have any feedback or ideas on upgrading it, you’re welcome to share it with our Support team at [email protected].
Bulk management with CSV
This feature allows you to export your current connections into a CSV file, edit them outside the Hreflang Manager application, using product handles to map the items, and then import them back into the application to apply changes.
This feature is useful for stores with some data inconsistency between the regional stores and their objects - Products, Collections, etc.
How to export connections:
- Navigate to the Synchronization page in the Hreflang Manager application.
- Click the Export button located at the top right of the page.
- In the pop-up window, select the resource type you want to export (e.g., Product, Collection, Page, etc.).
- Click the Export [Resource] button. A CSV file containing your current mapping will be downloaded to your device.
Note:
Please do not change the name of the exported file. The app uses the filename to identify which resource type you are updating during the import process.
Understanding the file structure:
If you are unsure how to format your data for import, you can download a showcasing file:
- Click the Import button on the Synchronization page.
- Click the "Download sample CSV" link.
- This sample file serves as a visual guide to show you exactly how the headers and handles should appear, so after your file import, the synchronization performs correctly.
How to edit the file:
- Open the downloaded CSV file in a spreadsheet editor like Google Sheets or Microsoft Excel.
- The first row (headers) lists your connected stores.
- Each following row represents a connection. To connect items, place their respective handles in the same row under the appropriate store column.
- Save the file in .csv format once your edits are complete.
Note:
This flow is only a suggestion that can be considered by you as an option to simplify your work with the connections. However, you can use any other convenient way for you to edit the connections outside of the app.
How to import connections:
- Navigate to the Synchronization page in the Hreflang Manager application.
- Click the Import button located at the top right of the page.
- Select the resource type that matches your file.
- Upload your edited CSV file.
- Click the Upload button.
Once uploaded, the app will begin the "rematching" process. You will see a temporary status screen. Click the Refresh button on this screen to check if the synchronization is complete.
Note:
Any connection created or updated via CSV import will be marked as "manual". These imported links will override any existing connections, including those previously matched by the system or manually.
Important rules for data processing
- Handle matching: The system matches your items strictly based on their Shopify handles.
- Invalid handles: If the file contains a handle that does not exist in your store, the system will simply ignore that specific row and continue processing the rest of the file.
- Duplicate handles: If the same handle appears in multiple rows of your CSV file, the system will only accept the connection from the last row where that handle was mentioned.
- Unchanged data: If you import a file without making any changes to some specific connections or the file in general, the previous synchronization statuses will remain exactly as they were.
- Incorrect file: In case you import a file that is irrelevant to the Synchronization in the Hreflang Manager app functionality or contains a list of stores in the first line, that is not relevant to the store where you’re uploading the file, the application will show you an error. Review the file and upload the respective one.
Blog tags synchronization
For advanced store structures, in case you need to have the Blog Tags synchronization reflected in your hreflang tags, this functionality is available but managed outside the main Synchronization page.
To synchronize the blog tags, follow the instructions:
- Go to the Settings page in the Hreflang Manager app.
- Navigate to the Advanced tab.
- Locate the Blog tags mapping section.
- Toggle the feature On.
- Click the provided link to access the dedicated configuration page for your blog tags.
- Map the blog tags manually, the way you want to have it configured.
Managing visibility (Resolved connections)
If you have finalized the matching of a certain item, the connection is complete, and you no longer need to see them, you can mark them as resolved to declutter your workspace on the Synchronization page.
Note:
This function doesn’t influence the reflection of the items on your store or connection in the hreflang tags in your theme. It was made only for the visual clarity of the space while you’re working with the synchronization of the items in the Hreflang Manager app.
To set the connections as resolved, follow these steps:
- Select the checkboxes next to the connections you want to remove from view.
- In the header, click the Set as resolved button.
- The connections will be erased from the Unresolved connections list.
To view the resolved connection:
- Untick any checkboxes if you have.
- Locate the Show all resolved toggle and turn it on.
- Only the resolved connections will appear on the list.
To make unresolved:
- Untick any checkboxes if you have.
- Locate the Show all resolved toggle and turn it on.
- Via checkboxes, select the connections you want to make unresoloved (visible) again, and click Set as unresolved.
- The connections will disappear from the Resolved list. To review them, turn off the Show all resolved toggle.
Page interface elements
On the Synchronization page, you can also utilize different tools for a better experience and productive work on this page. The following tools help you navigate and manage your connections:
Search bar
Use this to find specific items by their Title, SKU, or Barcode.
- Use the whole words for the search to make the search results proper.
- Press the Search button on the page or Enter on your keyboard for the search to start.
Sorting menu
Organize how connections are displayed on the page:
- Non-synchronized first: Prioritizes items that haven't been linked yet.
- Synchronized first: Shows already established connections at the top.
- Newest first: Shows the newly created items or lastly updated connections first.
- Oldest first: Shows the oldest created items or the oldest updated connections first.
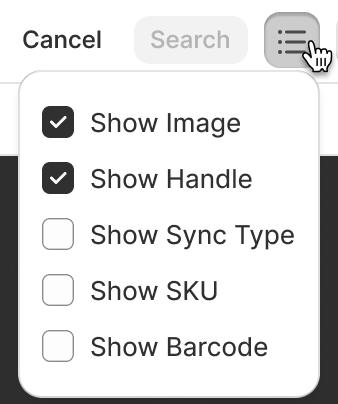
Product info
Customize which identifiers (like image, Barcode, or SKU, sync type) are visible for each item within the connection blocks. The list of information includes:
- Image
- Handle
- Sync type
- SKU
- Barcode
Filters
Review only the necessary connections by filtering them by different categories.
- Sync Status: This filter allows users to organize items based on their current connection state:
- Synchronized: Displays сonnections that are successfully linked across all connected stores.
- Partially: Displays сonnections that are linked in some, but not all, connected to the app stores.
- Non-Synchronized: Displays сonnections that have not yet been linked, and there are standalone items in there.
- Store Filter: This filter allows you to view items and connections associated with a specific connected store (e.g., mystore-1.myshopify.com). When applied, only the connections where the items for the chosen store are present will be shown.
- Show all resolved Filter: This filter allows toggling between two views:
- Unresolved: The default view, showing all connections that you need to frequently interact with.
- Resolved: Shows connections that have been manually marked as resolved. This is typically used for connections that are already finalized or do not require frequent editing.
FAQ about Synchronization page
Can I use the CSV Export and Import feature to sync Blog Tags?
Currently, the CSV Export and Import functionality is available for Products, Collections, Pages, Blogs, and Articles. Syncing for "Blog Tags" is not supported for the time being.
What happens if I leave a cell empty in the CSV file?
If a handle is present in one or a few stores' columns, but there is a column in that row that is empty, after the file import, the application will update the connection anyway. The connection will have a partial sync and manual statuses.
I received an error message during upload. What should I do?
Ensure that your file is in .csv format and that you haven't renamed the file from its original exported name (e.g., it should still contain the word "product" if you are uploading product connections). Also, check that the store URLs in the header row in the file match your connected stores exactly.
Can I import multiple files at once?
No, you can upload one CSV file per resource type at a time. If you need to update both Products and Collections, please perform two separate import operations.
What happens when I add new items in Shopify Admin after using CSV import in the Hreflang Manager?
When new products, collections, or other items are added to your Shopify store, they will not be automatically added to existing connections, even if mapping keys (SKU, barcode, or handle) match. You will need to map these new items via manual sync in the app. This logic is designed to prevent automatic processes from overriding or damaging the specific connections you have carefully set up via CSV import.
Will manual or CSV changes be overwritten by the automatic sync?
No. Any manual action or CSV import takes priority. Once you manually link or import a connection, the automatic matching logic will not override your specific setup.